In this month-long series, we’re taking inspiration from the KonMari method, by organising and spring cleaning our CRM, category by category, to make it a super smooth, easy, and lasting process.
Category 1 is Data Cleansing and this week, we’re going to highlight some tools within your Zoho CRM that can help you easily clear through, clean out and organise your data.
The data you hold as a business is vitally important to a smooth-running business, so it’s worth spending the time to clean it, organise it, and stay on top of it. Remember a CRM is only as good as the data you have in it!
In order to do a thorough data cleanse, there are 3 steps:
- Sorting using Filters
- Actioning using Mass Actions
- Organising using Custom Views
In this weeks blog, we’ll be laying out a written guide to help you use the tools to clean out your data but if you would rather watch a video of the tools being used, head to our Closed Facebook Group, Zoho Manchester User Group, to gain access to exclusive training videos.
Filters allow you to search through your records in each module, setting your search criteria based on the values of the fields. You’re basically asking your CRM to show you all the records that match what you’re searching for.
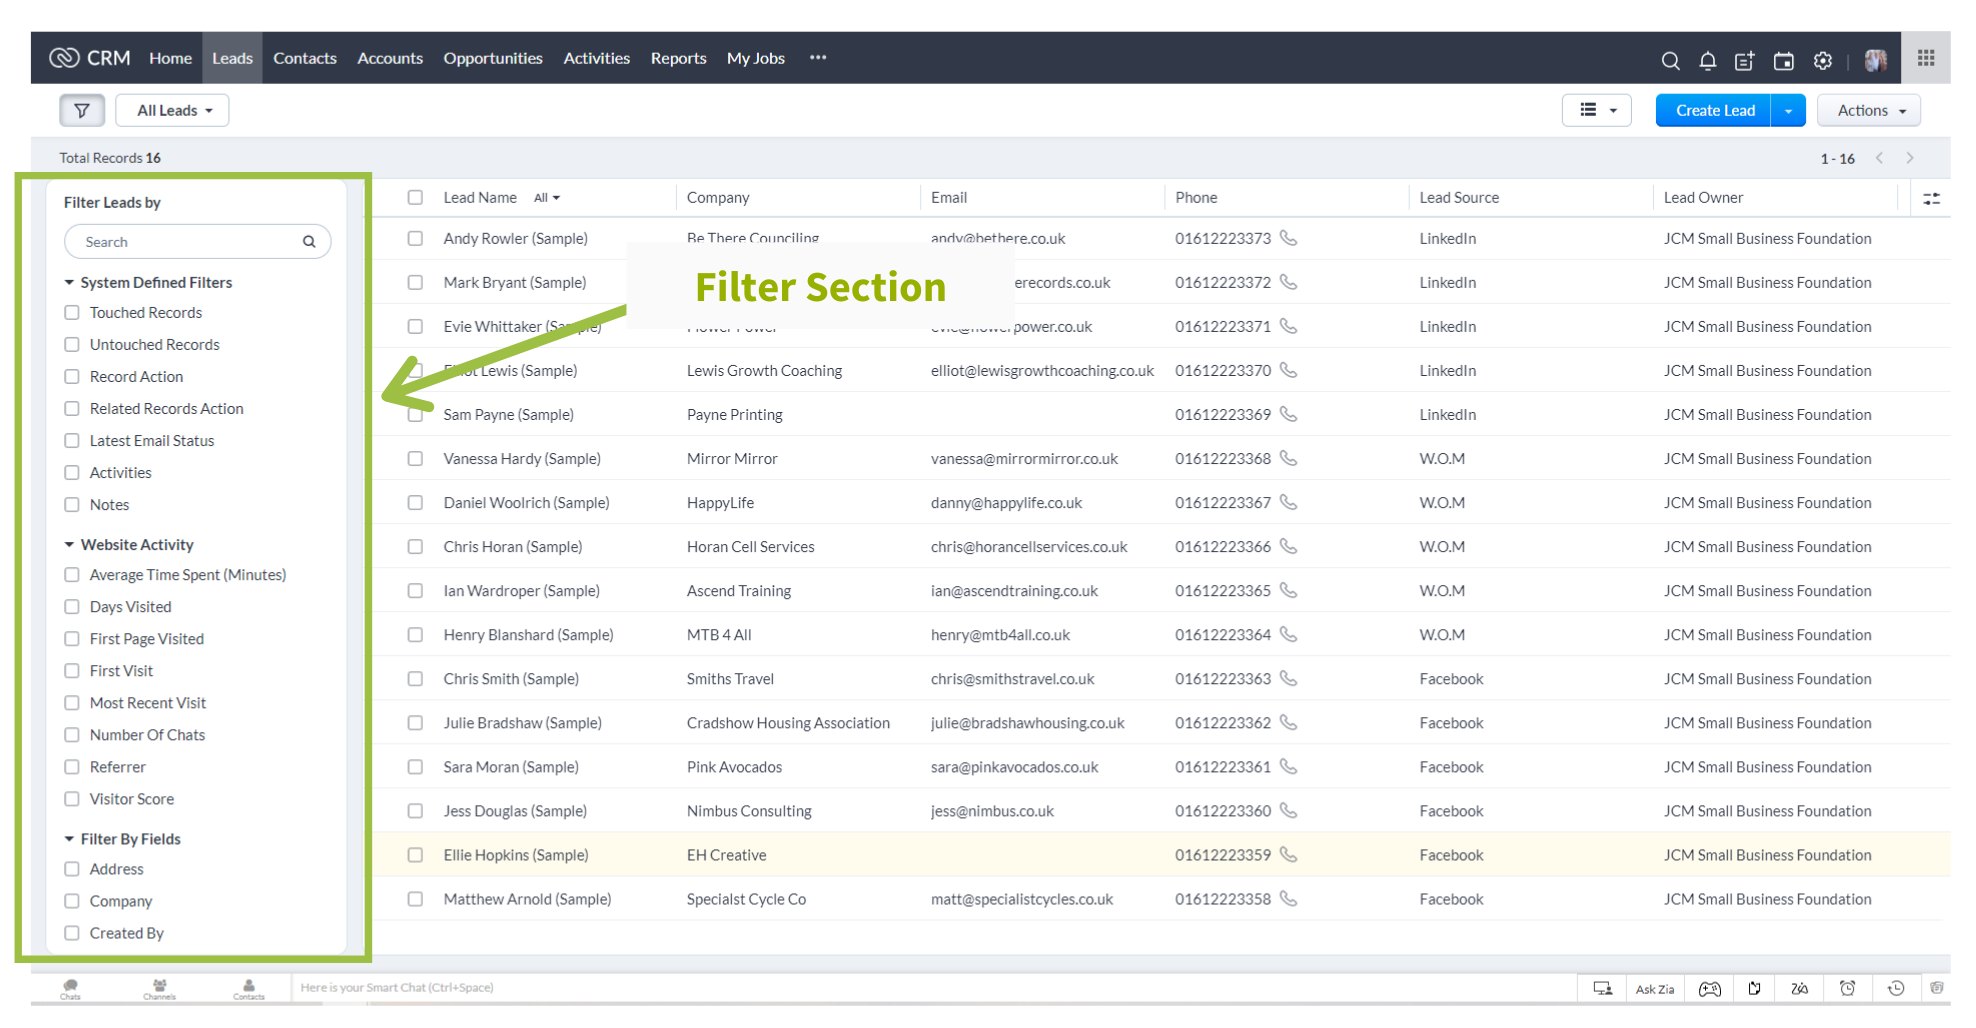
To set up a filter, open the module you want to sort through, for example Leads, and you will see the “Filter Leads by” section in the left hand side. This presents you with all the fields within Leads that you can then search by.
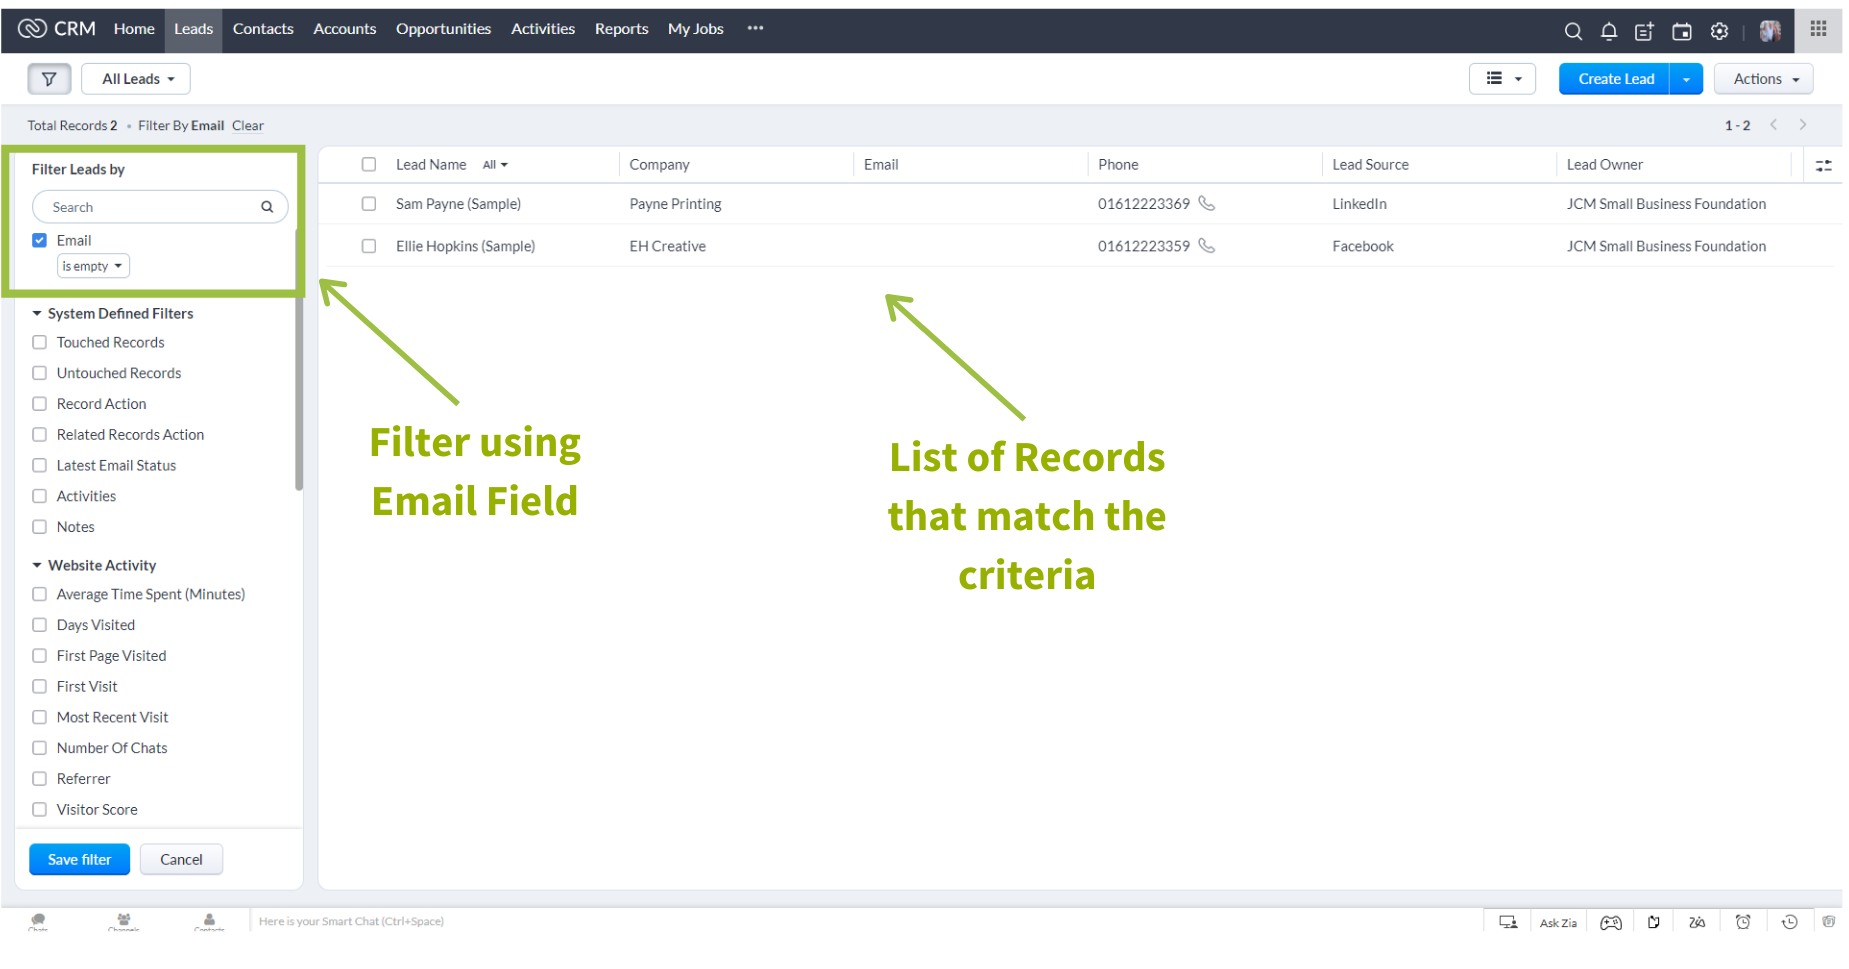
For example, you might want to clean out all the leads that don’t have an email address. So you would go to the filter section in Leads, select Email and then select your condition from the drop down. You’ve got a load of options here that make it really easy to get the data you want. So in this example, you’re going to select the condition “is empty”, so you’re asking the CRM to show you all the leads where the email is empty. You’re then going to click Apply Filter, and a list of all your leads with no emails will appear.
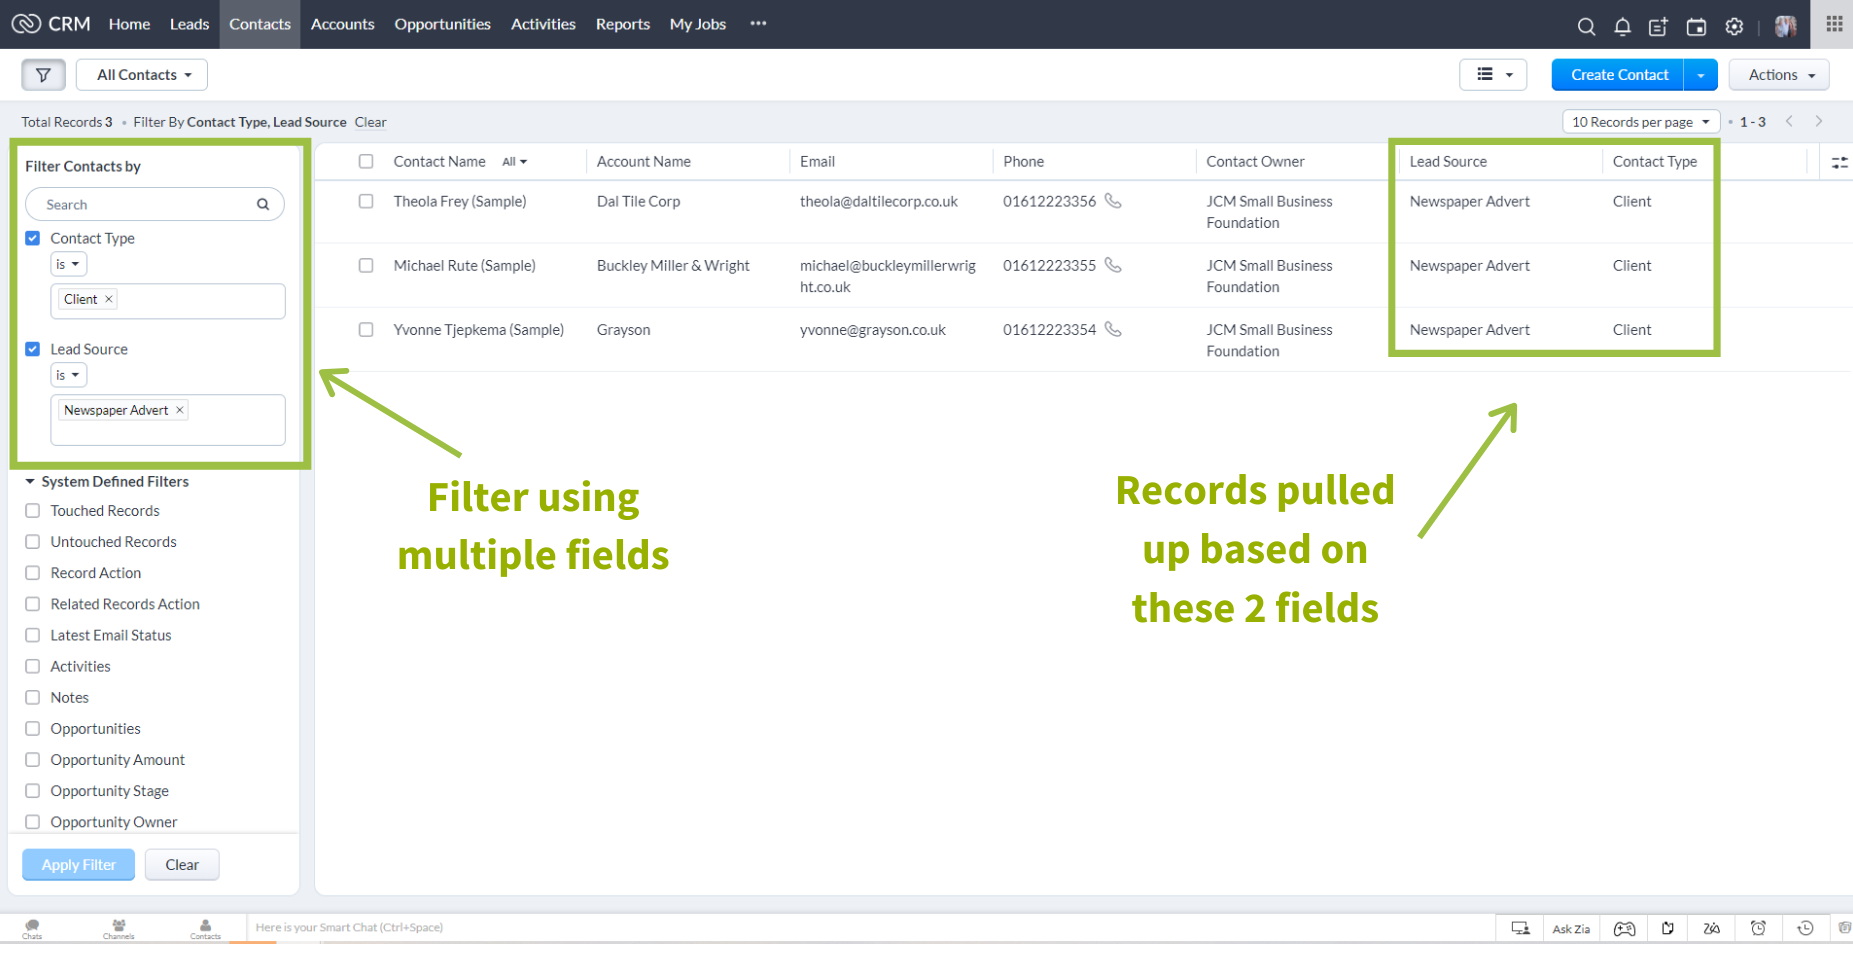
You can use Filters to search using every field in that module, including system-generated fields like Created Time, Record Owner ect, and you can search multiple fields at the same time. For example, if you wanted to know which clients came to you through a newspaper advert, your search criteria within your Contacts Module would be, Contact Type “is” Client as well as Lead Source “is” Newspaper Advert. Contact Type and Lead Source are the fields you’re searching by.
NOTE:
- Remember to “clear filter” once you’ve done what you need to do.
- If you’ve created a filter but it’s not pulling any data through, check what view you are in within the module. Look at the top left of the screen, this will tell you what custom view you are using. If you need to filter through all the data within that module, make sure the view is set to “All Leads” for example.
- You can save a filter to come back to later, just click “Save Filter”
So, now that you know how to create filters to sort through your data, what do you do with that data?!
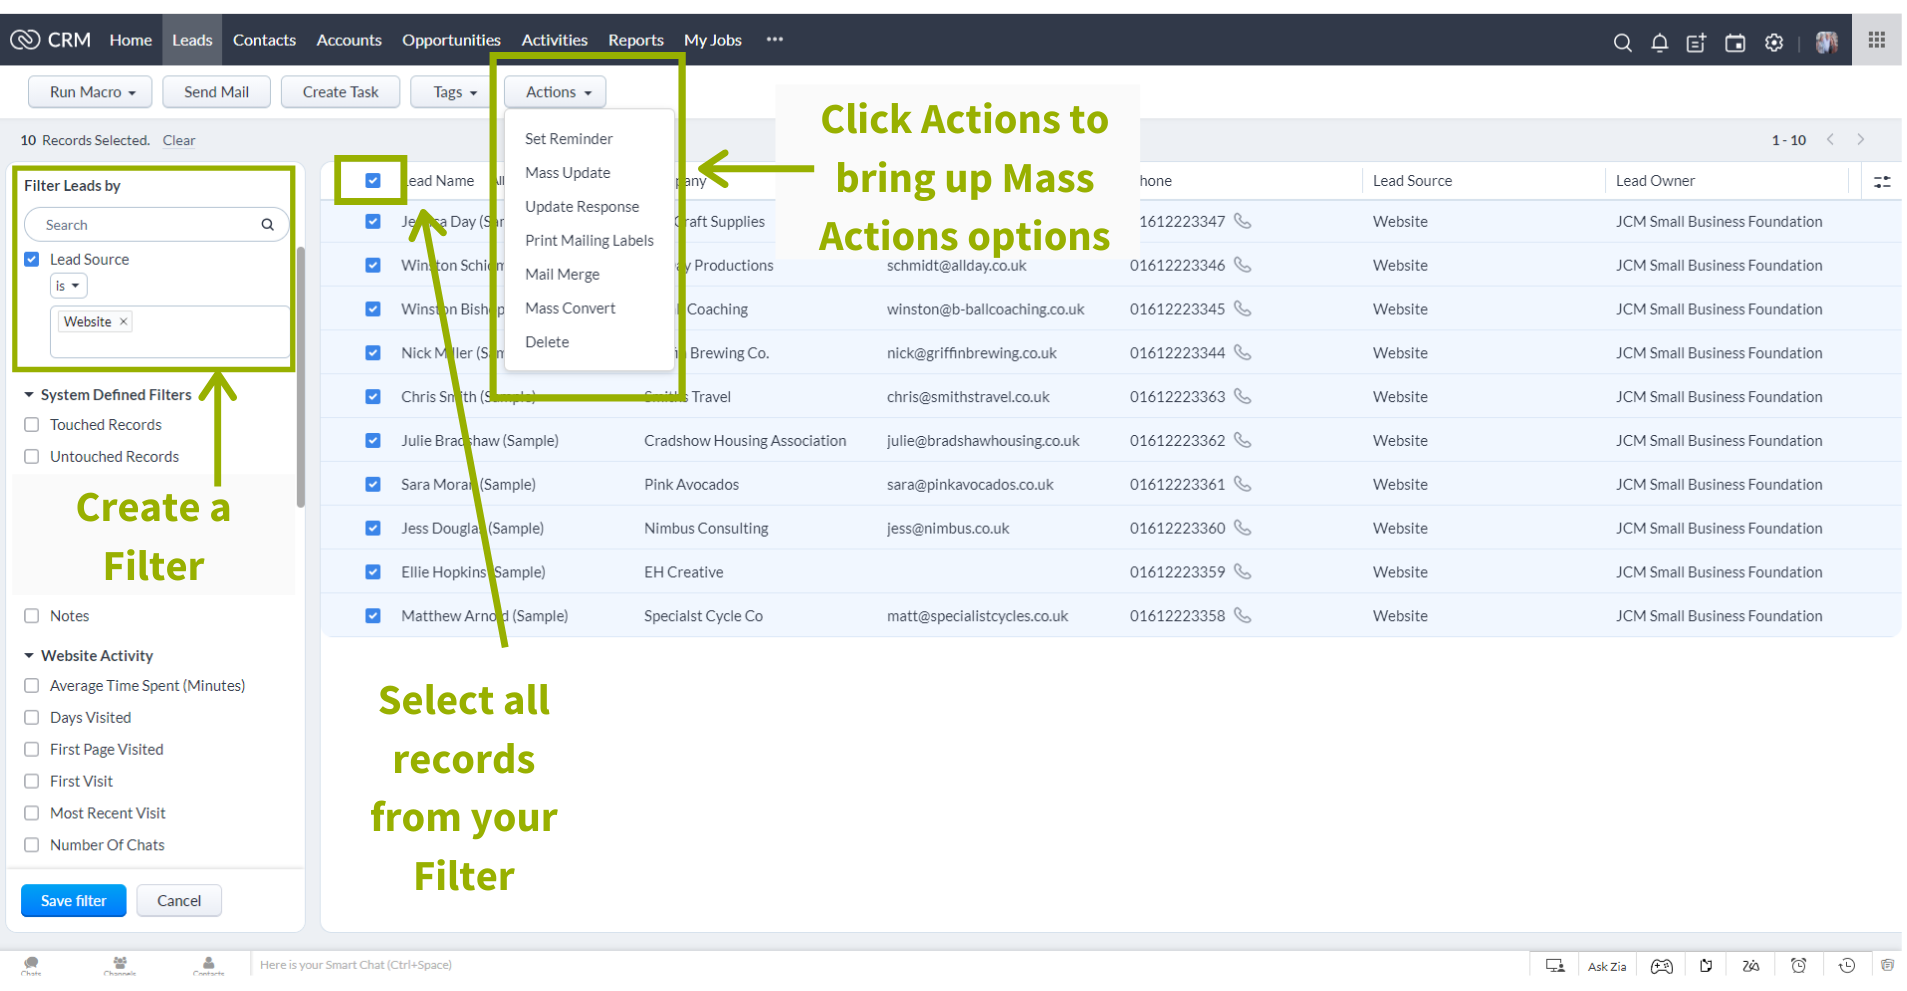
Mass actions allow you to quickly apply one action to a whole list of records.
The mass actions that will help you to cleanse your data are:
- Mass Update
- Change Owner
- Mass Convert (Leads Only)
- Delete
Once you’ve created your Filter, you can select all the records in that view by checking the box at the top of the first column, and a toolbar will appear at the top of the screen. Here you can see an Actions button and from there you can decide what to do with the records you have in your filter.
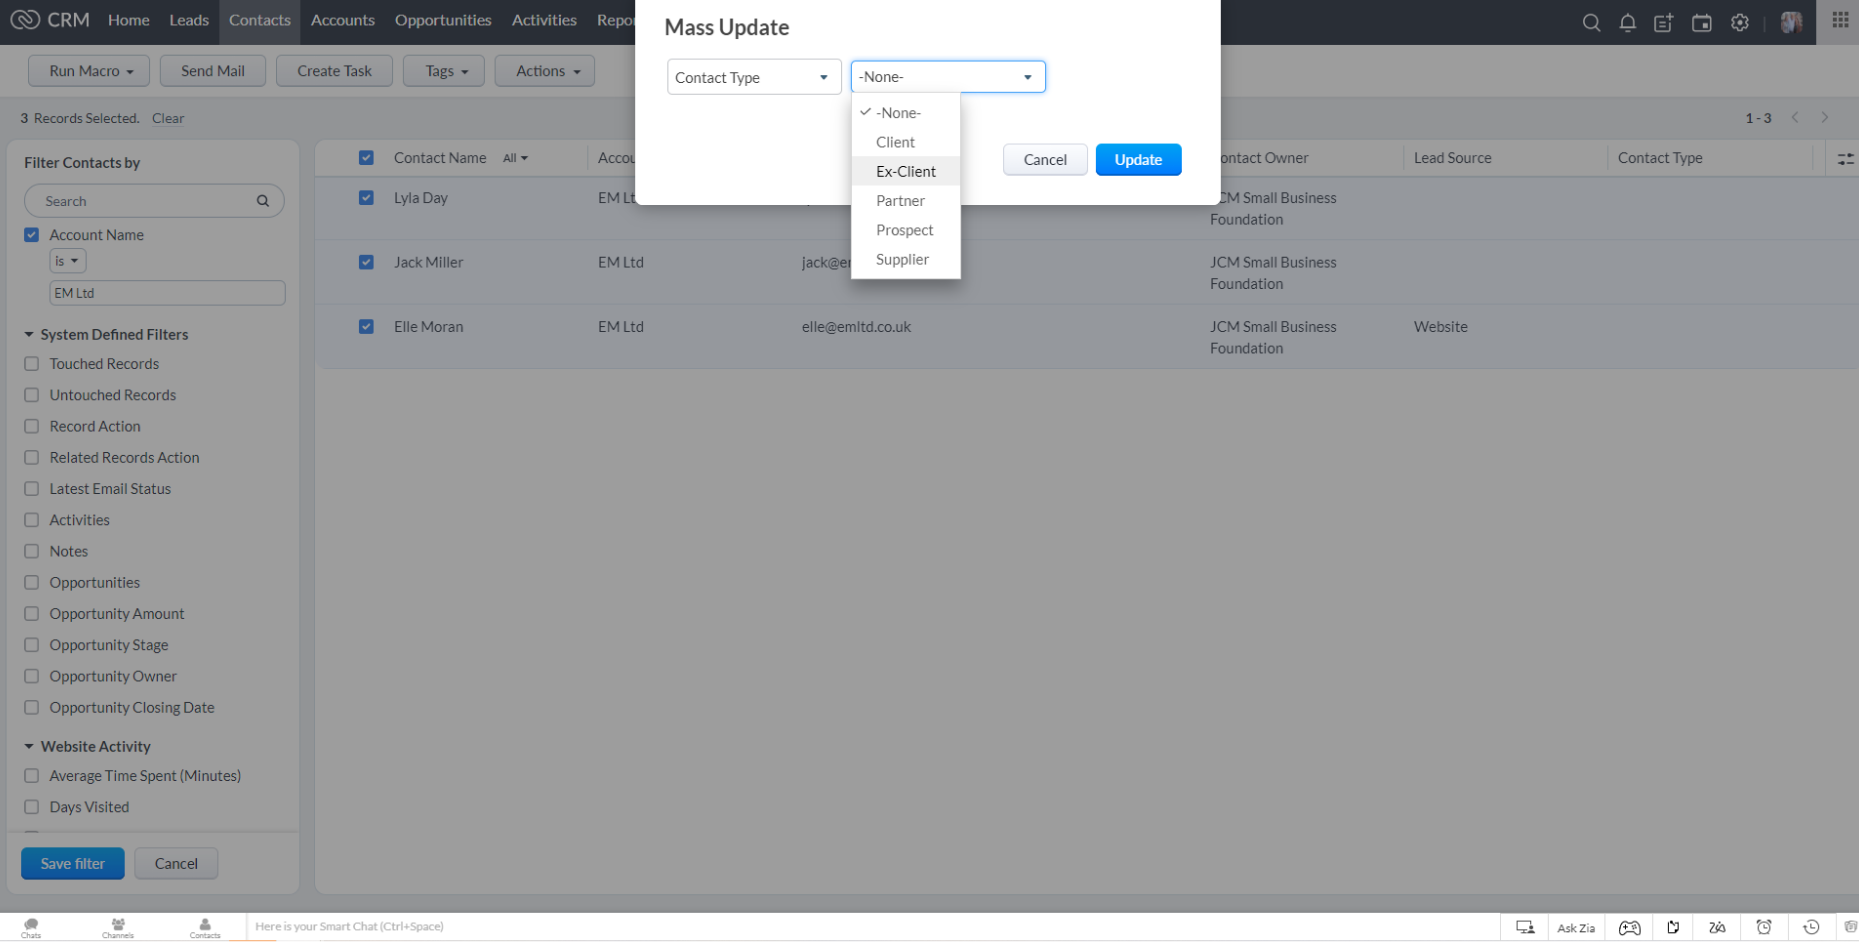
Mass update – updates a field value for every record.
You have an old client, EM Ltd, that is no longer a client so you need to update all the contacts that you have within that organisation to Ex-Client. In the Contacts module, you run a filter looking for records where the Account Name is EM Ltd. This pulls up any contacts that you have linked to that organisation. Select all by ticking the checkbox at the top of the first client, Select Mass Update from the Actions drop-down, select Contact Type field from the select field drop-down, and the Ex-Client from the next drop-down. Click Update and this will update everyone within that organisation from Client to Ex-Client.
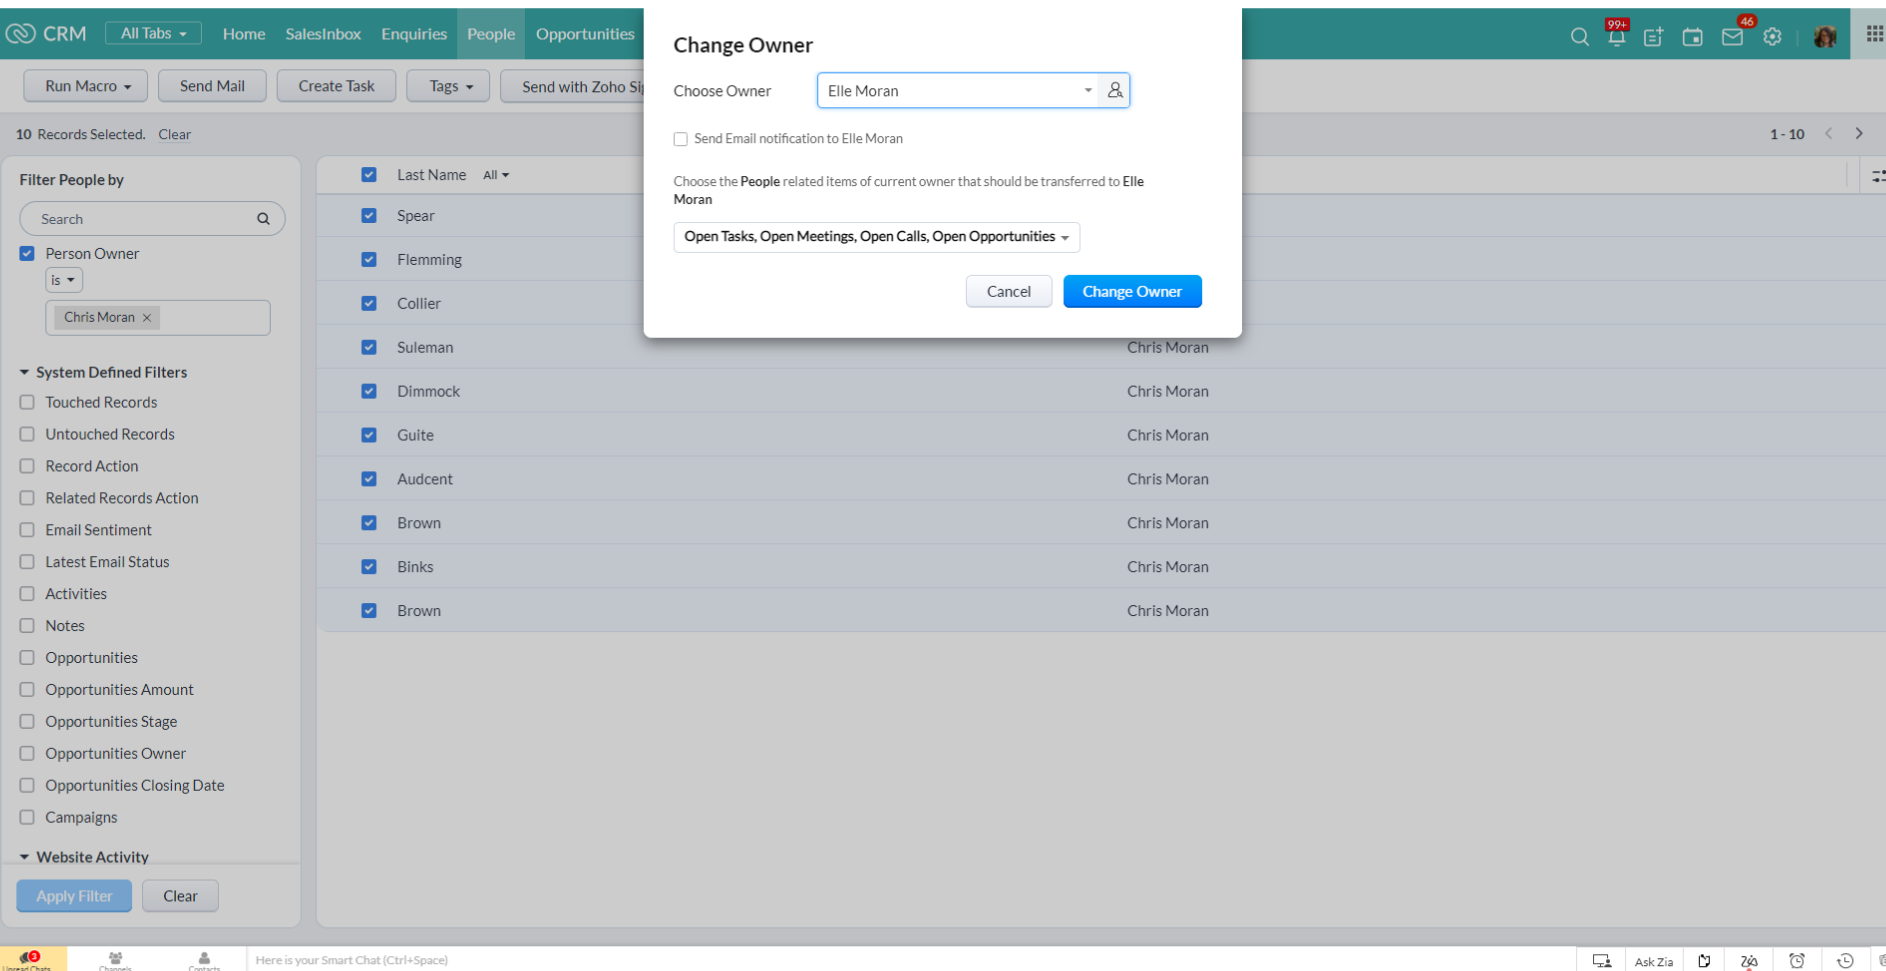
Change Owner – changes the owner of every record in the filter.
You have a member of staff that has left your organisation and you need to transfer all the clients they were responsible for to a new member of staff. You create a filter, searching for the Contact Owner is Jen Smith (old member of staff), and now have a list of all the clients she was responsible for. Click the checkbox at the top of the column to select all records, then click Change Owner. You then select a new member of staff, or user in CRM terms, from the list provided and click Change Owner. Now, all of Jen Smith’s clients are reassigned to another member of staff.
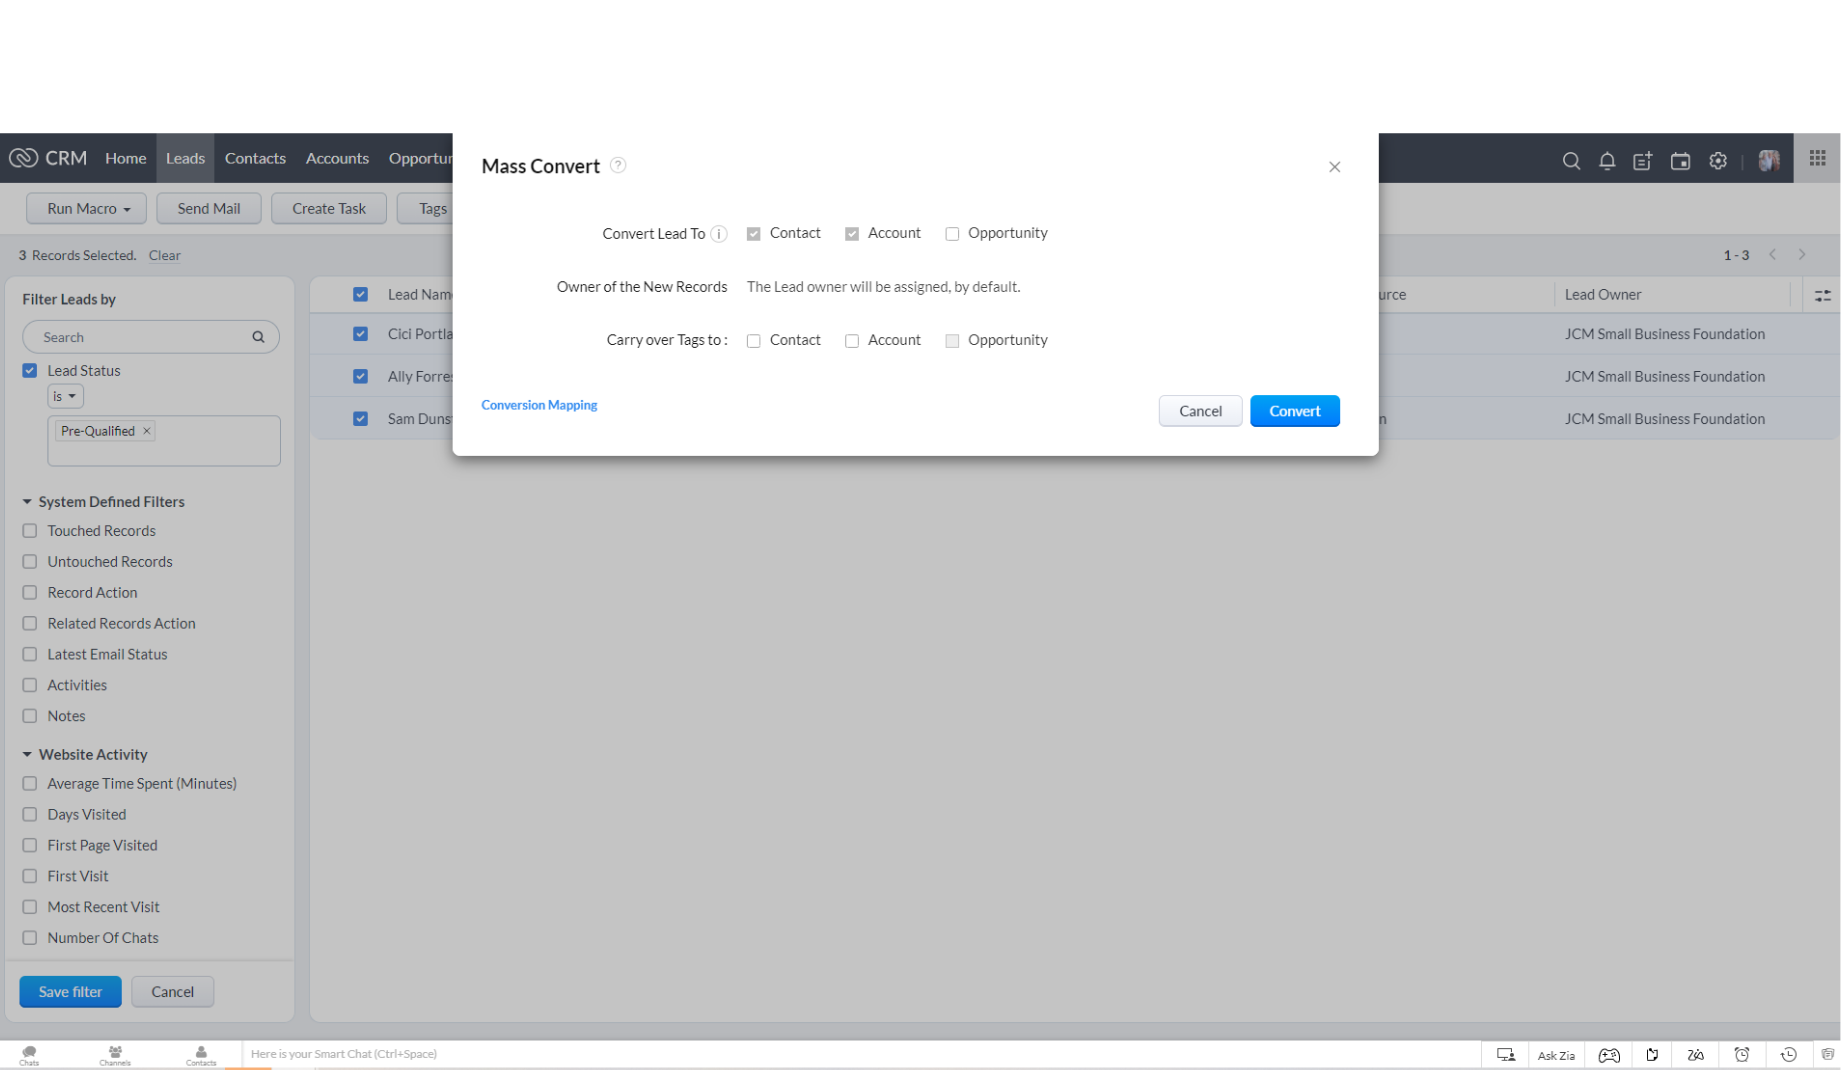
Mass Convert – converts a list of Leads into Opportunities.
You’ve been working hard to contact your Leads and are ready to convert some of them through to Contacts and Accounts. You run a Filter in Leads, where the Lead Status is Pre-Qualified, select all in the view and click Mass Convert. This then creates an individual Contact and Account for everybody that was in that filter, rather than you having to convert each one individually.
Delete – deletes all records in the filter.
In Leads, you want to get rid of anyone who doesn’t have any contact information. You run a filter that searches for “Phone is Empty”, “Mobile is Empty” and “Email is empty”. Once you have your list of uncontactable leads, you select all, click Delete from the Actions drop-down and they are deleted from your CRM.

So now you’ve gone through and cleaned out your data, either deleting it from the CRM altogether, updating it so it has relevant information or moving it from one module to another, it’s time to organise it, and we do that using customer views.
In your CRM a “view” is the list of data you can see in each module ,and a custom view allows you to organise your data into manageable, meaningful lists, so you’re not just dealing with your entire list of data all the time. Zoho CRM has a number of default views, from All Contacts to Today’s Leads, that help you see your data in bitesize chunks already.
But you can also create your own views based, like the filters, on the fields within each module.

To create your Custom View, open up the module you want to organise, and click the drop-down at the top left of the screen (in Leads for example it will probably be set by default to “All Leads”). This will open up a drop-down and you can see all the views that are either default by Zoho CRM, or custom views that have been created by you and your team in the past. If you have a lot of old custom views already, maybe take a second to delete any views that you don’t need anymore. To do this, select the view, then hover your mouse next to the view name at the top left of the screen and click the edit pencil. From here you can update the custom view or delete it altogether.
To create a new view, click the New Custom View button at the bottom of the list of views. Give your view a name and from here you can define your criteria. For example, Contact Type is Client, which would give you a view of only your clients. You can also search by multiple criteria by clicking the green “+” button. For example in Opportunities Module, a Sales Director might want to create a view for each salesperson to keep track of where they’re up to with their deals. The criteria from that view would be, Opportunity Stage is Developing + Opportunity Owner is Tom Moran. This would give the Sales Director a view of all of Tom’s developing deals.
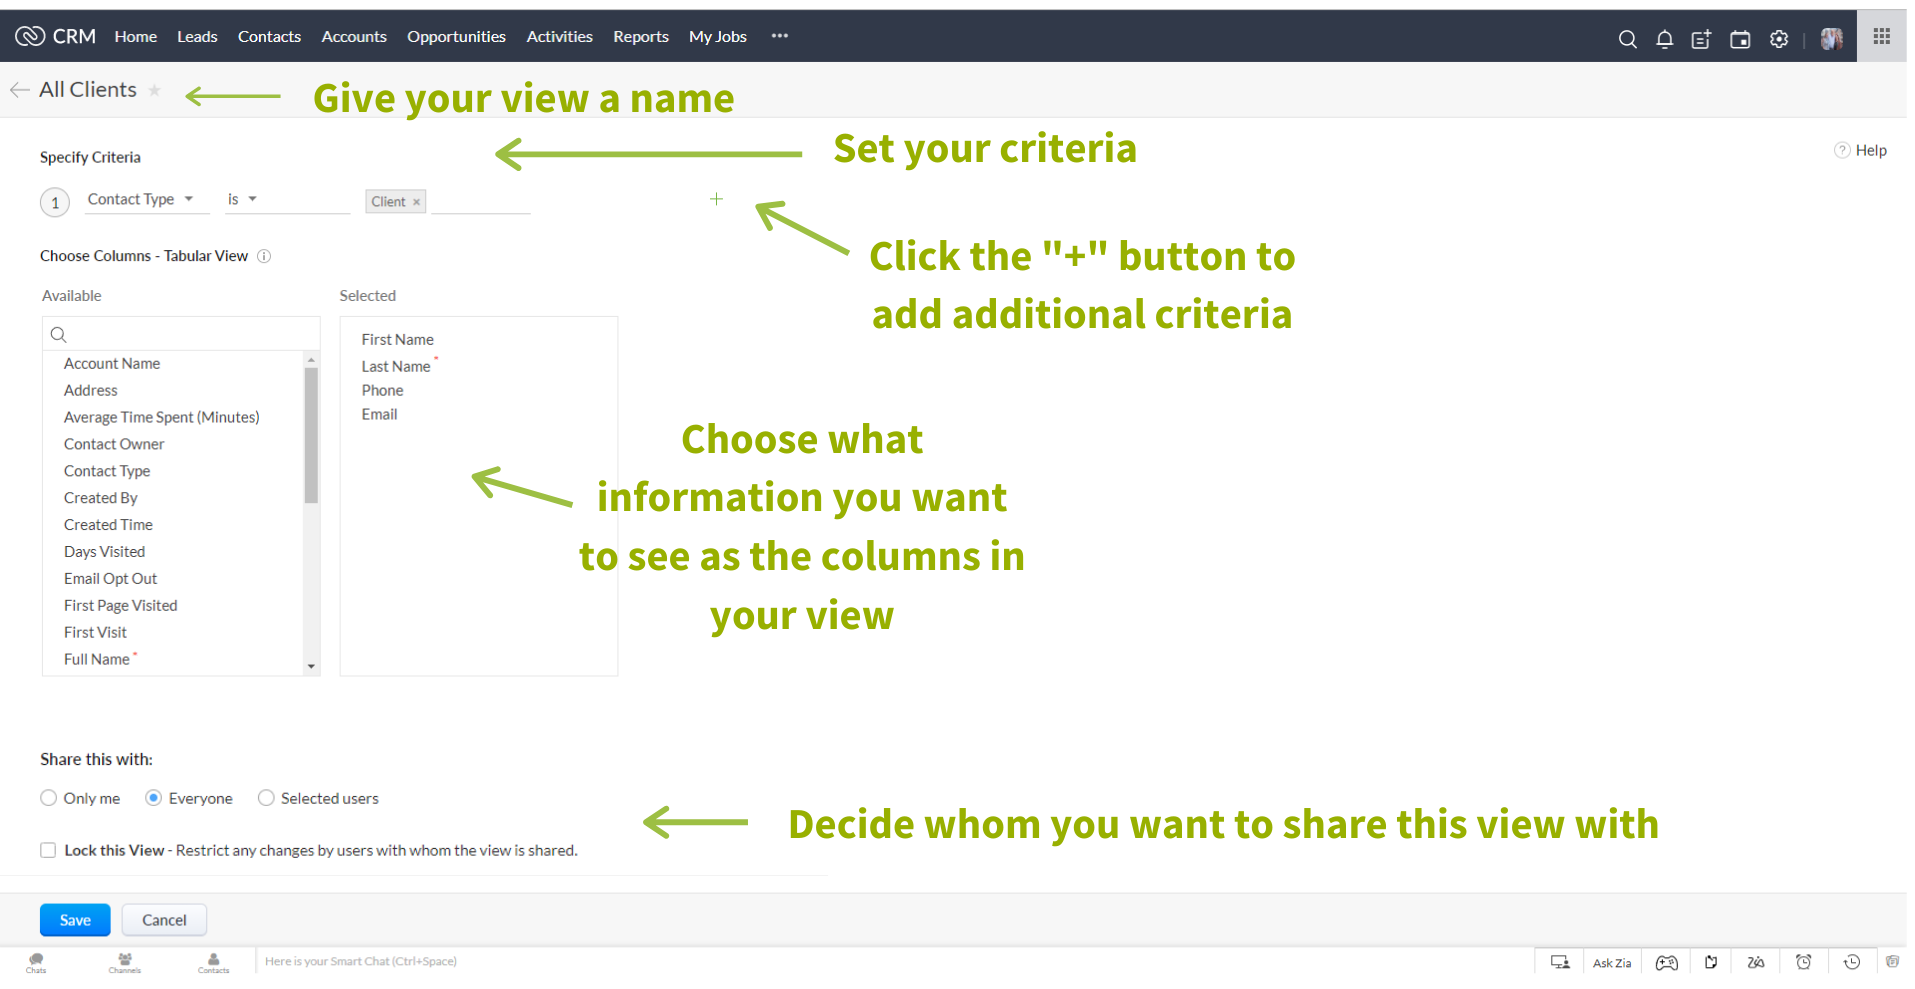
Once you’ve set your criteria, you can decide what information, or columns, you want to see in the view by simply dragging your desired fields over from the available box to the selected box.
You can then keep the view private, so only you can see it, share it with everyone in the organisation or select certain users to share it with.
Click Save and your Custom View is ready to go! You will be able to select your custom view from that drop down at the top left of the screen, and from now on, any new records that meet the criteria specified within your Custom View, will be automatically added to the view.
To recap, the first category in our KonMari method of cleaning and organising your CRM is to cleanse your data, and to do that, you want to be using these 3 tools within your CRM:
- Filters to sort through your data
- Mass Actions to clean out or update the records within the filters
- Custom Views to organise the data left in your CRM
We’ve covered some really basic examples in today’s blog. As you start to clean out your CRM, keep the end in mind. What information do you want in your CRM and how do you want it to look?
Next week we’re looking at Communication, making sure your users have their emails synced to the CRM as well as looking at Email Templates.
Don’t forget, if you want access to exclusive training videos, including a video of everything covered in today’s blog, join our FREE Facebook Group, Zoho Manchester User Group!